
How to Know if an Exercise Is a “Good One”

Questions to Guide One’s Movement Choices

As a physical therapist, I am asked almost every day if a particular exercise is a “good” one or not. Often, people have a toolbox of movements taught by past physical therapists, personal trainers, or ones that they have found online (or even discovered for themselves).

Deciding whether a particular movement is a good fit for someone or not is extremely subjective and depends on many factors.

Any exercise has the power to be helpful, harmful, or neutral. Deciding the potential for benefits of an exercise is context dependent: it depends on the person’s goals, abilities, as well as their biomechanical history and overall state of health. It also depends on to what extent they are performing the exercise (e.g. too often vs not enough) and what else they are doing (would they otherwise be doing something that is more beneficial, or is it a choice between this exercise vs doing nothing at all?).

The choice also depends on psychological and social factors: Does one feel safe performing the movement? Do they enjoy this movement or have curiosity about it? Does the individual have adequate space and equipment to practice the move, or does it require something that they do not have access to?

Assuming that the individual is willing and able to perform some form of an exercise safely, here are five questions to guide whether it is beneficial, or perhaps how to increase the benefit of any exercise chosen for one’s routine.

  1. What is the Intention of the movement?

  2. How is my breathing?

  3. Can I reverse this movement?

  4. How can I modify/adapt the movement as needed?

  5. What is the appropriate volume (how much/how many)?


Question One: What is the intention?

To get the most out of a particular exercise, one must understand what they are doing. Without having an intention, one might perform a movement on autopilot without integrating the sensory information from the body.

Without understanding the intention and paying attention, it is likely that the movement pattern will be imprecise and ineffective.

Example: The Squat
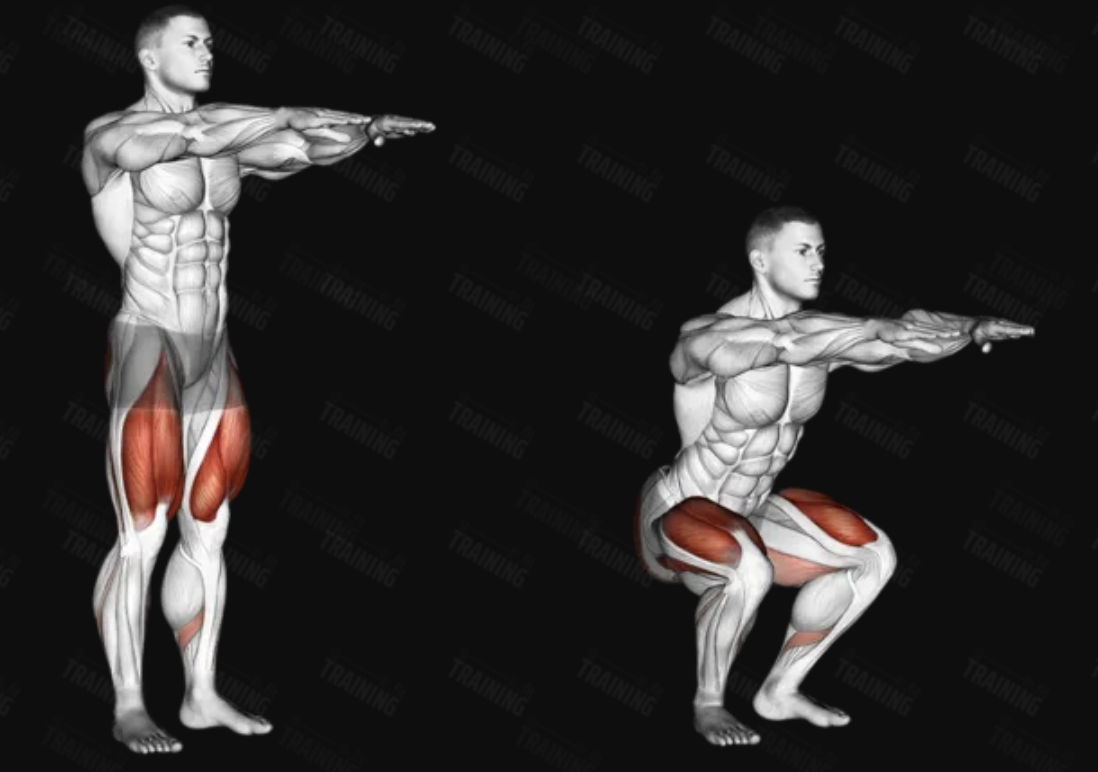
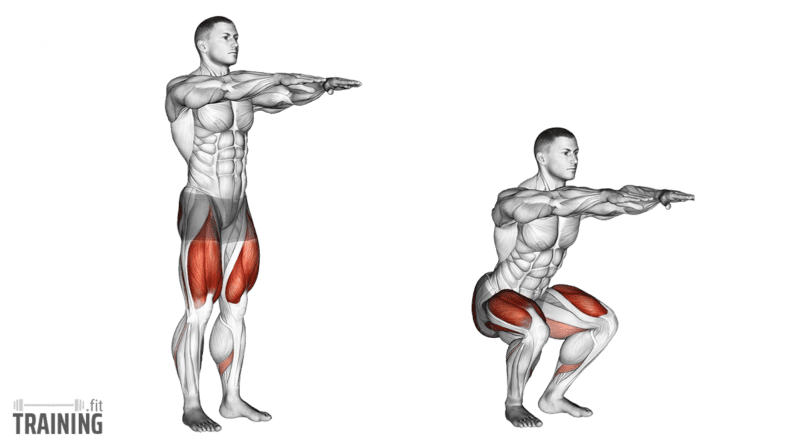
Take a body weight squat, a basic strength training move with many potential benefits. The intention could fall under many categories, including skeletal, muscular, external, or simple verbal.

Skeletal intention: An example of using a skeletal/joint based intention could be as follows: While keeping feet flat on the ground, bend at the hips and the knees to bring the backs of thighs and calves closer together. Return to the starting position.

Muscular intention: An example of a muscular intention might be for someone who already has the basic form of a squat, but wants to finesse the ability to sense and control particular muscle groups. Squat to create a stretch in the glutes and quadriceps. Stand up while consciously contracting those muscles.

External intention: Squat down, then push your feet through the ground to stand up.

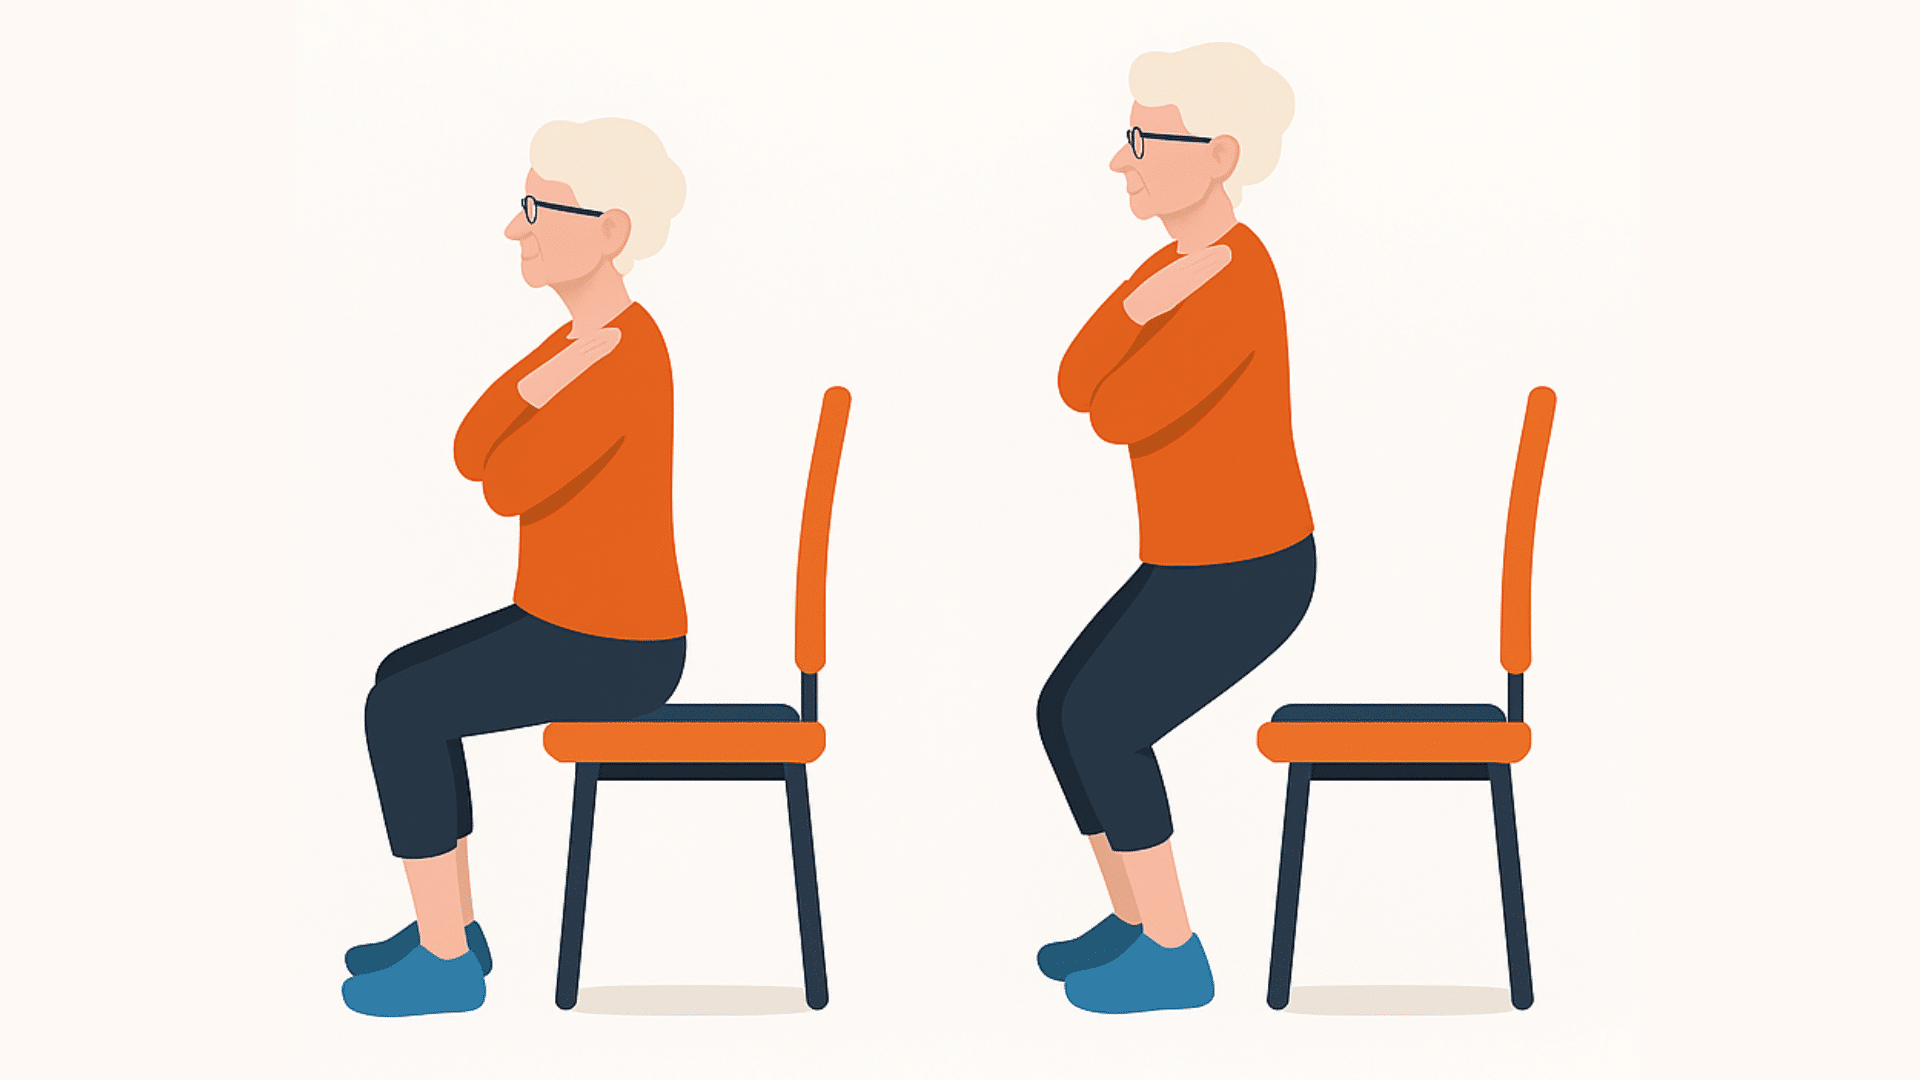
Simple verbal: Pretend there is a chair behind you. Go to sit on the imaginary chair, and then stand up. Or, put more simply, sit down, stand up


Question Two: How is my breathing? 

The tendency to unintentionally hold one’s breath is very common, especially when learning a new movement. However, this should not persist past the initial stages of learning.

If the breath is held or otherwise erratic and uncoordinated, the movement is likely too challenging. By continuing to practice a movement without having awareness of the breath, the nervous system learns that the movement is a “threat” and not consistent with a calm state of being.
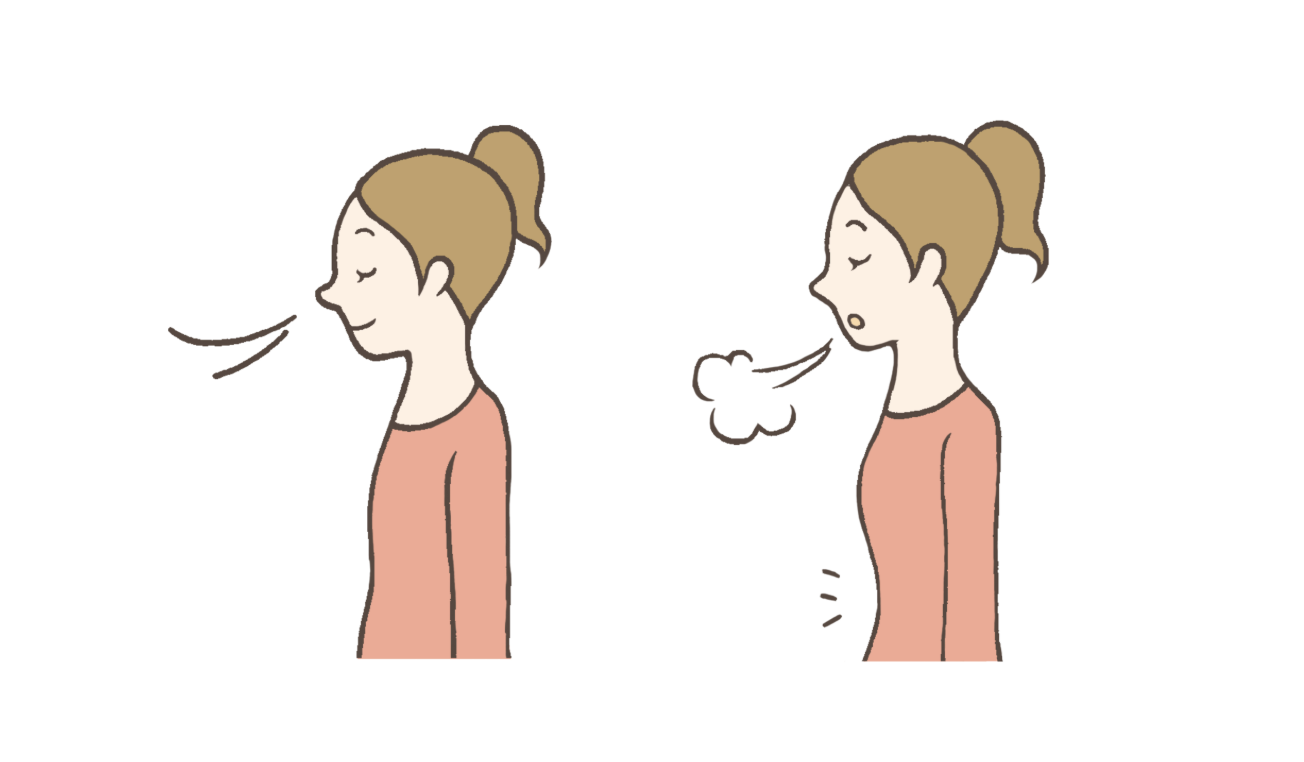
People often ask, “Am I breathing correctly?” Or, “when is the inhale, and when is the exhale?” The specifics don’t matter as much as the awareness. Being able to pay attention to one’s breath while moving can help ensure that the breathing will coordinate well with the movement.

The natural coordination between breath and movement is generally to exhale during exertion (muscles contracting/shortening actively), and to inhale during relaxation (or during muscle lengthening).

For the squat, this coordination would be to inhale while sitting down into the squat, and exhaling while returning to stand.

This can help avoid strain and improve the efficiency of movement, but it is not a requirement, and not always the best way for every individual. Most important is the ability for one to be aware of how they are breathing or choosing to breathe.


Question Three: Can I reverse the movement?

Reversibility is the ability to go back the way you came. In other words, you can equal and exit a movement with equal ease, and you don’t get “stuck” during certain phases of the movement. One should be able to “change their mind” during any part of the movement.

Reversibility reflects having movement options, control, and awareness. And ensure that the joints stay healthy, as the muscles are able to control the forces involved in the movement throughout the entire range of motion.

The squat involves “reversing” at the bottom and at the top of the movement. So, if one sits into a squat, the reversal happens when returning to standing. Or, once in standing, reversing it again to initiate the squat. This reversal can happen at any phase of the individual’s choosing: There are variations of the squat such as a “one and a half rep” squat, in which one squats down low, stands up half way, reverses this to squat down again, then stands up all the way.

If someone is having trouble reversing a squat (perhaps they can sit down low but the knees are strained when standing up), then it is important to modify the movement to avoid this strain (see question four for ideas


Question Four: How can I modify or adapt this movement as needed?

Sometimes, depending on the day, recovery from a particular pain or injury, or countless other reasons, an exercise might be more beneficial if it is made easier. This is contrary to the popular saying “no pain no gain” and similar ideas. Being able to recognize when one needs to modify an exercise, and having the knowledge and skill to implement the modification represents adaptability, and is far more beneficial than pushing through something that is beyond one’s ability.

Subtle signs of strain may happen in the moment. For example, the movement may begin to no longer “match” the intention, the joints may begin to ache, the breath might be held, or there might be a general sense of “offness”. Or perhaps it is not until the next day in which it becomes clear that an exercise was too much.
An acronym to help one know how to modify a particular movement if there is suspicion of strain is as follows: LESSSS is more!

L: ighter

E: asier

S: ofter

S: lower 

S: maller

S: moother

Not all of these strategies need to be implemented, but one or more of them can be excellent ways to help a movement fit one’s particular needs and abilities.

The first strategy to try might be to go with a “smaller” movement: for example, if squatting very low causes strain, simply practice a smaller squat in which the hips do not drop as low, and observe if this creates a more comfortable way to move.

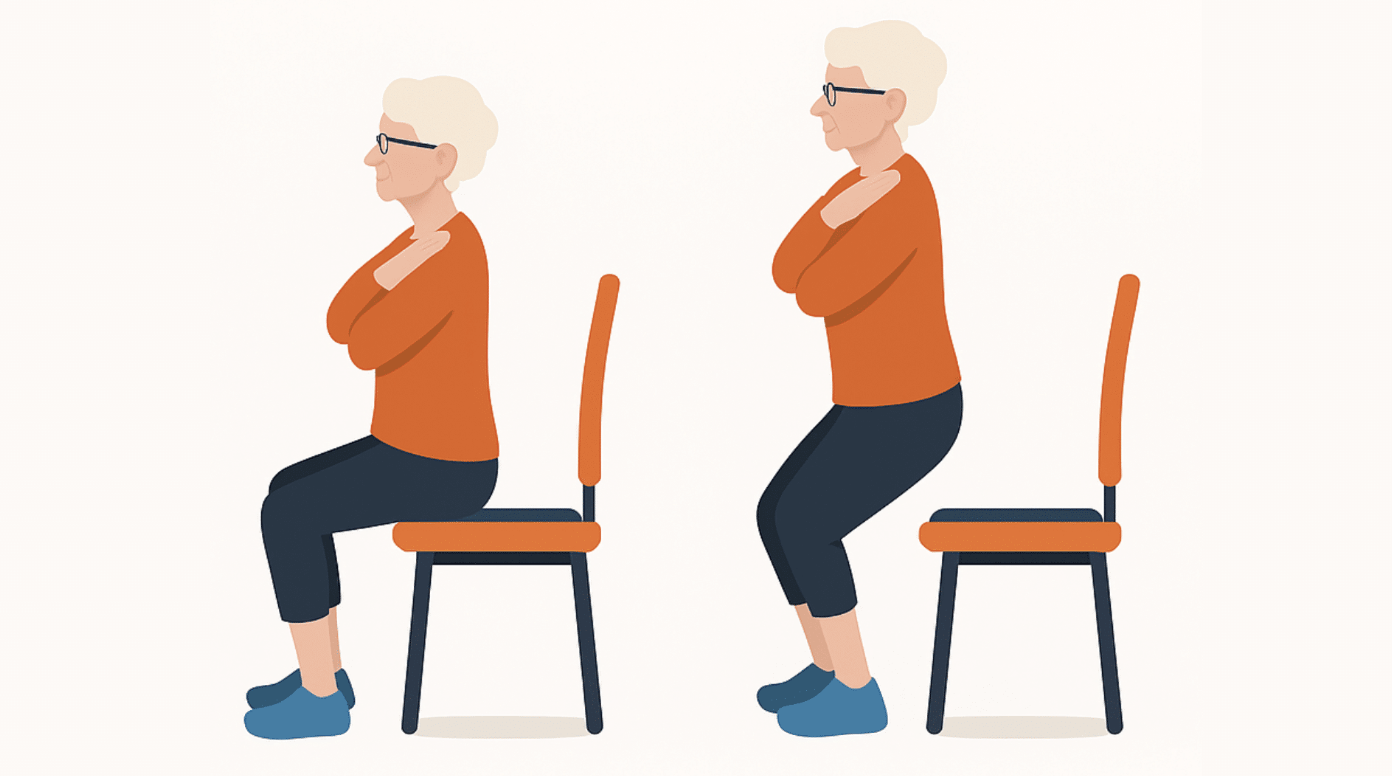
Or perhaps use an actual chair and practice sitting and standing from the chair, as this might feel more safe, familiar, and naturally incorporate a smaller range of motion. 


Question Five: What is an appropriate volume based on my goals (AKA how many should I do?)

Finally, how does one figure out what volume of a particular exercise to incorporate into a fitness routine? This question is highly individualized, and is best decided with the help of a physical therapist or other movement specialist. An exercise could check all four of the previous boxes, but if not done enough benefits could be missed, or if done too much harm could result.

The individual’s goals are always a consideration. If someone is practicing squatting, what is inspiring them? Maintaining or improving the ability to get up and down from chairs comfortably without the arm rests? Or, building increased strength and bone density to improve fitness and decrease the chance of osteoporosis?

Those two goals might come from very different people, and therefore the volume will likely be different.
For the individual simply hoping to get up and down from chairs, it might be recommended to practice “a little bit, often”. For example, if there is a particular chair that this person sits in, perhaps doing five squats each time they are about to go sit down in it, which might be five times a day (25 squats per day).

For the individual hoping to build muscle and bone, this simply would not be enough. Perhaps initially it would be, depending on their fitness level. However, the squat routine would have to gradually get more challenging in order for the muscles and bones to adapt and remodel into stronger tissues. This might involve doing 3-4 sets of 6-12 repetitions, with the last couple repetitions of each set becoming extremely challenging and difficult. This may only be done 2-3 times per week to allow the challenged muscles time to heal. And as the individual gets stronger, variations of the squat could be included (e.g. one and a half reps, changing the base or range of motion), as well as external resistance added (holding a weight at the chest or two weights on the shoulders).

Clearly, the decision around practicing a certain exercise is extremely nuanced, and best discussed with a professional. Bottom line is to make sure to understand the mechanics of the movement, breathe well, switch directions with ease, avoid strain, and find the sweet spot between over and under-doing.

Oh and one more thing… the most important thing is to have fun 😀

Written by Jacob Tyson, DPT - Physical Therapist, Yoga Instructor

Images:

https://t4.ftcdn.net/jpg/16/96/73/23/360_F_1696732370_pCKNiz5ElNPuDYOYkBRXK4kTMNfgetbX.jpg 

https://media.self.com/photos/6092c6f54eb017b40e89d517/2:1/w_1280,c_limit/fitness_workouts_movement.jpeg 

https://training.fit/wp-content/uploads/2020/03/kniebeugen-800x448.png 

https://www.leehealth.org/getmedia/bbb6364a-6a5b-4223-9696-802088d162a8/shutterstock_1756279598.jpg 

https://img.freepik.com/free-vector/two-blue-cycle-arrows_78370-7799.jpg?semt=ais_hybrid&w=740&q=80 

https://www.lotusyogadallas.com/wp-content/uploads/2025/07/Right-Way-to-Do-It-and-Improve.png 

https://static.vecteezy.com/system/resources/thumbnails/012/939/275/small_2x/animated-workout-schedule-e-card-planning-weight-loss-exercises-looped-flat-colorful-hd-footage-with-alpha-channel-social-media-post-animation-design-web-banner-ecard-video.jpg

The Two Arrows: How to Minimize Pain-Related Suffering

Pain is one thing. Suffering related to the pain is another. We often do not have total control over our pain, but we can learn to have more control over what grows around our pain:

The stories we tell ourselves about our pain, and the ways that our pain impacts the rhythms of our life.

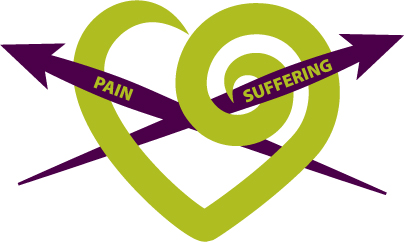
Buddhist philosophy often refers to two arrows. Imagine a person in the forest gets struck in the arm by an arrow, and pain results. That is the first arrow. Then, the person begins to think… “What’s going to happen? Am I going to get an infection? Am I going to lose my arm? How will I be able to work? What’s going to happen to my family? Who is going to support them?” That is the second arrow.

The first arrow is the pain itself- the event and the raw sensations of the pain. The second arrow is what our mind does in reaction to the event. Our mind assigns meaning to the pain, creates a narrative, compares our pain to our past pain and our expectations of future pain, emotions ensue, and suffering results.

The first arrow we generally cannot control. The second arrow we can. 

Beware of the second arrow. The second arrow often grows bigger than the first. This second arrow is what contributes to prolonged suffering, unhelpful beliefs about our pain, and perhaps withdrawal from our lives, our loved ones, and our loved activities.

Tendency towards a second arrow of suffering could be considered a habit. How do we become more aware of and break our unwanted habits? Check out our past blog post, “Befriending Unwanted Habits” for more information.

Becoming aware of the two arrows is the key to minimizing the impact of the second arrow. This can apply to physical pain, but also any other event that triggers anxiety or other negative emotions.

Try this as an example. Consider an event that brings about distressing feelings, be it physical pain, or emotional pain such as anxiety, fear, sadness, or frustration. Perhaps this is an event that happened recently. Try to identify the first arrow, and then identify the second arrow. What are you telling yourself that is creating the second arrow?

For instance: “Today, I spent a long time gardening. Now my back hurts. What did I do wrong? Is there something damaged in my spine? Perhaps I need to get imaging. What does this mean for my future? Should I stop gardening? Is there something wrong with me?”

1. Identify the arrows

Can you identify what the two arrows are?

→The first arrow: Temporary sensations of discomfort experienced in the low back.

⇉The second arrow: All of the thinking that happened afterwards. Self-blame. Catastrophization and medicalization of the pain. “Predicting” the future. Assigning meaning to the pain without evidence. Consideration of avoidant behavior.

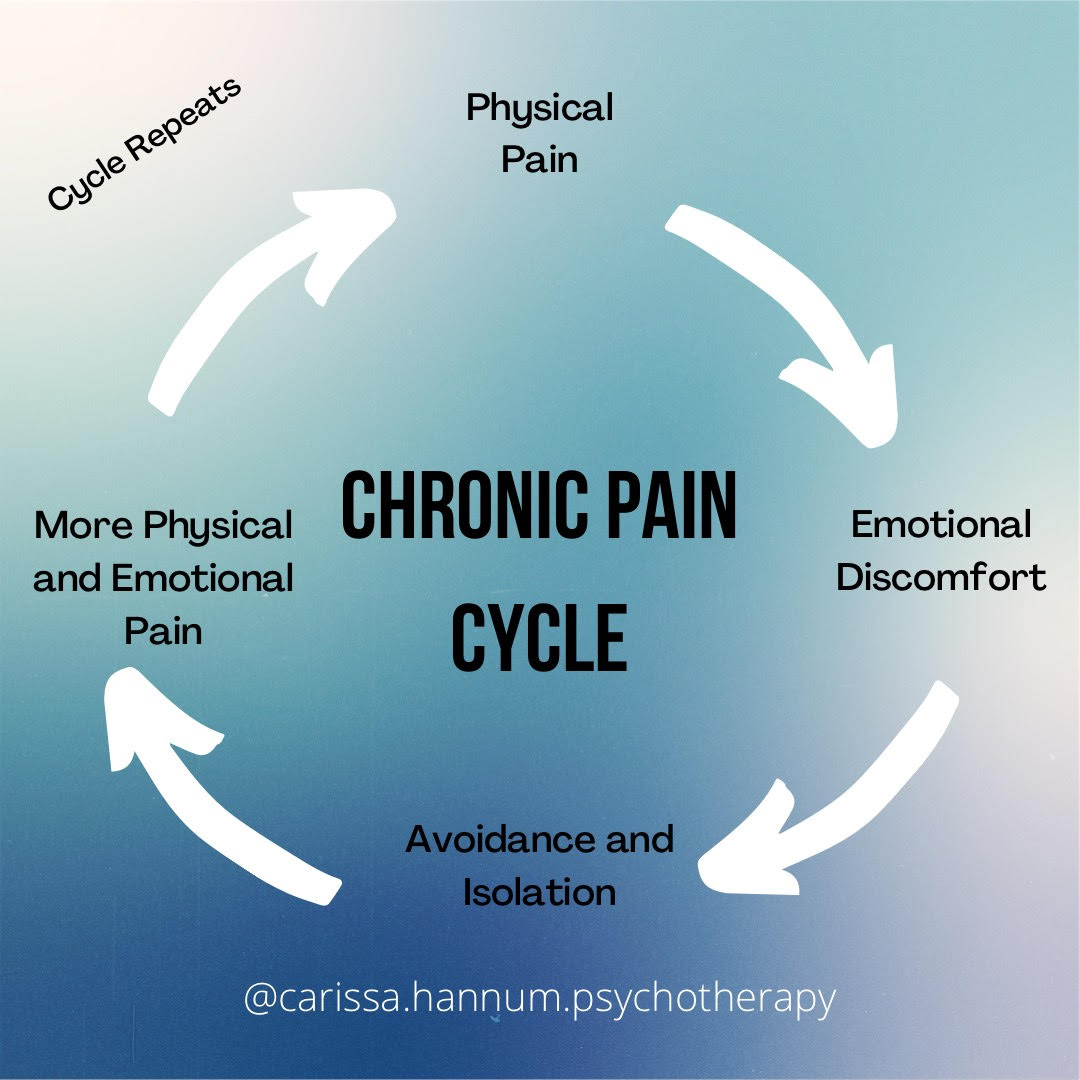
The second arrow makes the pain worse, and can create a feedback loop that contributes to a chronic pain pattern. Once we can start identifying the first arrow and distinguishing it from the second arrow, we can question the second arrow or let go of it to minimize suffering

2. Create a new response

After identifying the two arrows, notice if there is resistance to letting go of the second arrow. Where does that resistance come from? What is the harm in letting it go? 

Now, create a new response. Letting go of the second arrow, let’s pay attention to the first arrow. The intention is to accept the first arrow, and then practice self-kindness

Acceptance: Acknowledge and accept what is happening right now. Consider the mantra “This belongs too.”

Self-compassion: Then practice saying something kind to yourself. Imagine the first arrow happened to someone that you dearly love. A partner, a child, etc. What would you say to them if the first arrow were to happen to them?

Let’s relate this to the above example-

→The first arrow: Sensations of discomfort experienced in the low back.

♥New response: “This too. These sensations belong, they are what I am experiencing right now, and they will pass. I am strong, resilient, and have the tools that I need to get through this. Perhaps next time I will try some movements to warm up my body before gardening, and take breaks when my body begins to request them. ”

The quest to become pain-free is fruitless, because pain is an inevitable part of life. The first arrow will come. The quest to minimize suffering related to pain is realistic and achievable, and starts with becoming aware of the second arrow, and practicing self-compassion and acceptance whenever it arises. 

Summary of Key Points

  • Two metaphoric “arrows” can exist relative to our pain experience. The first is the initial event and raw sensations of pain. The second is our reaction- our thinking and behavioral changes relative to the first arrow.

  • First arrow = pain. Second arrow = suffering

  • Distinguish between the two arrows in your own life, and change your response to the first arrow to minimize the impact of the second.

  • To the first arrow: Develop any mantra that communicates self-compassion and acceptance. “This belongs too.” “I am safe.”

  • Feel how changing the response to the first arrow has the potential to minimize pain-related suffering

Written by Jacob Tyson, DPT - Physical Therapist, Yoga Instructor and The Wellness Station Team

Hip Hinging: What, Why and How?

Hip hinging is a very powerful movement that our bodies can do, that allows us to bend, lift, squat, and even climb up stairs and hills. Learning what a hip hinge is and how to do it well helps us to move more efficiently, minimize pain and injury, and enhance our fitness routine.

What is a hip hinge?

A hip hinge is essentially any movement that involves… well, hinging at the hips! Typically, it refers to a movement in the sagittal plane (forward and back plane) that allows the flexing at the hips (creasing the fronts of the hips), and subsequently extending the hips (opening the fronts of the hips). Rather than the movement being initiated at the spine, knees, or elsewhere, the movement pattern is initiated at the hips.

The hips are a ball and socket joint, as the joint is the union between the socket provided from the pelvis (acetabulum) and the ball from the thigh bone (head of the femur). So hip hinging must involve motion relative to the ball and socket, typically the socket of the pelvis rolling forward and back over the ball from the thigh bone.

Examples:

Many daily movement patterns, as well as exercises that one might perform, involve hip hinging. Here are some examples of hip hinging:

  • Sit to stand: The act of getting up and down from the chair involves hinging at the hips, as to sit, the hips must flex, and to stand, the hips must extend.  

  • Deadlift: Lifting and lowering a weight from the ground using a hip hinge

  • Squat: Sitting the hips back and down as knees bend, standing back up by thrusting hips up and forward

  • Step up: Single leg hip hinge involving putting one foot onto a step or platform which hinges the hip, and stepping up by extending through the hip/knee. 

  • Kettlebell swing: Holding a kettlebell with both hands, hinging at the hips to send the kettlebell back and down, extending powerfully through the hips to send the kettlebell out in front 

  • Sun salutations in yoga: A yoga practice is full of hip hinging. A traditional sun salutation, that involves going into a forward fold, lifting half way up, coming up to standing, etc involves a lot of hinging of the hips.

Why is it important?

Hip hinging uses the strongest, most powerful muscles in the body. This includes the gluteals, the hamstrings, the erector spinae, and the abdominals. Powerful coupling between these muscle groups helps create high levels of force, allowing us to move ourselves efficiently and lift heavy objects without injury. For this reason, getting to know how to hip hinge, and using hip hinges very often during daily activities and within a fitness regimen is an excellent way to stay strong and powerful.

Try these at home:

Here are several common cues that I use to teach people how to hip hinge-

  • “Buns in the oven”:  Stand about 6 or so inches in front of a wall, facing away from the wall. Pretend the wall is an oven. Send your buns into the oven by sending your bottom back to touch the wall (hips go back, or hips are flexing, as your upper body leans forward. Once your bottom can feel the wall, pause. You are in a hinged position. Come back to standing by taking your buns out of the oven (hips go forward, hips are extending).

  • “Roll the roller”:  Stand with a foam roller against your upper thighs. Roll the roller down your thighs by sending bottom back. Come back to starting position.

  • In kneeling: “Sit back towards your heels”: Knees on a kneeling pad, sit hips back towards heels as hands reach forward. Return to starting position.

  • Step ups: “Pull the thigh back”: Put one foot on a step or stool. Lean forward slightly. Step up, pulling the thigh back. Lower back down to starting position.

Written by Jacob Tyson, DPT - Physical Therapist, Yoga Instructor and The Wellness Station Team

Images:

https://orthoinfo.aaos.org/link/6e0531e00f714f43a2cb1f93fae0e762.aspx

Trouble Committing to your PT “Homework”? You’re not Alone!

The benefits of physical therapy can be immense, but only when one is an active part of the healing process. The learnings, lifestyle suggestions, and exercises taught by the provider are not confined to the clinic, but must seep into the rhythms of one’s day to day life. Otherwise, the time spent in physical therapy can be fruitless, or at least not as effective as it otherwise might be. Afterall, the time in the clinic only makes up a small fraction of one’s life. What one does outside of the clinic is up to the individual.

Why do so many have trouble bringing these practices home? The most common reasons are lack of time, lack of confidence in one’s own abilities (known as self-efficacy), lack of understanding of or agreement with the recommendations from the PT, the PT giving “too much” homework, forgetfulness, or simply being stuck in one’s habits with difficulty inviting changes to a fixed routine. Additionally, the desire for a “quick fix” to one’s pain or injuries, and subsequent disappointment with the realization that PT is an ongoing process and not an instant cure, can often set up a substantial barrier.

How do we address these barriers?

Establish a Commitment to Oneself

In order for PT to be effective, one must fully commit. The commitment goes beyond simply showing up for scheduled appointments. The commitment must involve willingness to have an open-mind, take on an active role in one’s healing, learn new things, willingness to invite in the new and to say goodbye to what is no longer serving.

Before scheduling a first appointment, one might ask themselves, “Am I willing to fully commit to this? Why or why not?”


A Strong Therapeutic Relationship

As PT is a two-way street, a strong relationship between provider and patient is necessary. This means the ability to engage in deep communication: active listening and responding. As a patient, one must communicate their needs, and be open to suggestions provided by the therapist. 

If the patient feels that their needs are not being met, or if they are not understanding the suggestions provided by the therapist, they must make this very clear. For example, if one feels that their PT is giving them too much or too little homework, the patient must communicate this. That way, the two can work together to find a program that best fits the needs of the patient.

It is critical that a patient feels a sense of trust and connection with their therapist. Without this, the therapy is built upon a weak foundation, and it will likely be ineffective. Without trust, the patient will not trust the therapist’s suggestions, and probably will not follow through.

Check out our previous blog post to learn more about what goes into a strong therapeutic relationship.


Self-reflection

Throughout the process of PT, the therapist will help guide the patient towards desired goals. The patient must also continuously engage in a process of self-reflection to ensure they are continuing to commit to an active role in therapy.

Here are some questions a patient could ask themselves throughout the process:

  • How and when am I going to do it?
    - ”It” refers to the suggestions and exercises from the PT
    - Establish a firm time and place to carry out the homework

  • Why am I doing this?
    - Focus on the “why” can help provide motivation. Why is this worth doing?
    - Remind yourself that you are doing it to better yourself, your health, well-being, comfort, etc. Or to become a better person for those that you love.
    - Remember your goals for PT, and write them down

  • What is going to get in my way?
    - What are the barriers? Is it time, space, commitments to other people?
    - How can you address those barriers?
    - If it is forgetfulness or lack of understanding, work with your therapist to find what helps you with this. This might be the PT sending reminder emails, taking detailed videos of the exercises, or it could be self-reminders by putting sticky notes up at home or in the office, keeping track of your exercises in a journal, or creating events/reminders in your calendar. 

When challenges are faced, it is important to be kind to oneself. Every moment of every day is a chance to begin again, re-focus, and re-prioritize this commitment to oneself.


Having a “PT journal” is a helpful tool to keep track of one’s commitment, intentions, progress, as well as for keeping a record of exercises completed and other provided interventions. This could be a very casual notebook, scratch paper, or the “notes app” on one’s phone. 

Here is an example of a tool that someone might use. Start by printing out several blank templates of the days of the week, perhaps divided into AM and PM. You could write what you intend to do in each blank, and give it a upon completion (or only write in the log once you have completed the activity).

After the initial effort of implementing a new practice into one’s routine, after around three weeks, one might find that it no longer takes as much discipline, and one might even look forward to these practices as the benefits become more clear. New habits take a while to fully form. Many have heard from pop psychology that new habits take 21 days to form. However, evidence shows that this is a myth, because the formation of habits is dependent on MANY factors. Generally, the most “simple” an activity is, and the more obvious the reward is (e.g. like drinking water every day), the quicker that habit will form.

On average, habits take about 66 days to form, after which they become “second-nature” or effortless.¹

The best way to create this new habit? Have an external cue (e.g. a sticky note) to perform an activity in a consistent context (e.g. a space in your home), and repeat it. Again and again and again. Perhaps the same time every day. Eventually it will become automatic.

At The Wellness Station, we aim to create a close, trusting therapeutic alliance. We seek to provide learning experiences, so the patient feels “on-board” with the process. We recognize the inherent challenges in this process, and are compassionate towards those who are having difficulty. Through close communication, your therapist will help to address any barriers throughout the therapeutic process, and together you and your therapist will steer the ship in the direction of your choosing.


Summary/Key Points

  • Physical therapy is a process that is guided by your therapist, but requires the patient to have an extremely active role

  • This involves a commitment from the patient to follow the suggestions from the provider, and to work together with the provider to address any barriers that come up relative to home practice 

  • The working relationship between the provider and patient must be built on trust and deep communication. 

  • As a patient, one should ensure they are fully committed by asking themselves why they are doing PT, what might get in their way, and how they will respond to these challenges along the way. 

  • Strategies to help improve participation in the home program might include having a PT Journal for self-reflection as well as for a log of exercises.

  • Additionally, have an external cue, such as sticky note reminders around the home or office, which provide visual cues to practice exercises. Or perhaps creating calendar events to practice could also be a solid reminder system. 

  • After consistent practice of an activity in a particular environment, the habit will become automatic and effortless, which takes an average of 66 days (though could be much sooner or later). 

Written by Jacob Tyson, DPT - Physical Therapist, Yoga Instructor and The Wellness Station Team

References:
https://www.ncbi.nlm.nih.gov/pmc/articles/PMC3505409/

Takeaways from Glucose Revolution

For anyone who has not yet read Glucose Revolution: The life-changing power of balancing your blood sugar, it is most definitely worth the read. It was written by a French biochemist, Jessie Inchauspé, and is the holy grail for anyone hoping to learn a little more about nutritional biochemistry.

Inchauspé provides background information about how what we eat and when we eat it can trigger glucose spikes, in which the amount of sugar in our blood goes up very quickly. Over time, many glucose spikes can be taxing on our organs, our mental and physical health, and can put us on the road towards serious health issues. Even if we have not been diagnosed with diabetes or prediabetes, chronic spiking of glucose can negatively impact our health, well-being and our waistlines.

The chronic spiking of glucose can lead to insulin resistance, chronic inflammation, atherosclerosis (and related heart events), as well as weight gain.

The book does not suggest dieting, as going on diets is often unsustainable. If we choose to restrict what we eat, we will often experience the “yo-yo effect”, in which we temporarily deprive ourselves only to drain our will-power and eventually return to our old ways.

Rather than dieting, if we are hoping to improve our health for the long-term, we must change the relationship we have with nutrition and exercise to be evidence-based, more enjoyable, and strategic.

How does this relate to physical therapy?

More glucose spikes means more inflammation. More inflammation means more irritated tissues, which leads to more pain. Excess weight also leads to inflammation, as well as increased biomechanical forces on joints, both of which contribute to pain. So, by improving our relationship to nutrition, we decrease inflammation, maintain a healthy weight, thereby making us less vulnerable to pain and unwanted strain on our tissues.

Takeaways

Here are the four takeaways that have stuck with me the most, and that I tend to recommend most often to clients who are hoping to enhance their blood sugar regulation.

Don’t “Diet”

If you’re on a “diet”, it is likely unsustainable. Consider asking yourself the following question: “Is the way I’m eating now sustainable?” Or “Could I see myself eating like this for the rest of my life?” If the answer is no, you probably would benefit from adjusting your mindset relative to what you are eating. Restricting calories or certain foods is likely temporary, and as soon as you stop doing it, your weight will likely bounce back to what it was before the restriction.

It is helpful to consider more the relationship you have to food and nutrition. To learn how to make decisions about food based on the best available information. To not deprive yourself of calories, but rather focus on nourishing your body with healthy, whole foods. Move away from counting calories, and towards counting how many different fruits and vegetables you eat in a week.

Seriously, try it. Over the course of a week, write down every single fruit and vegetable you eat. If you eat a banana seven times, this only counts as one, as I am referring to different fruits and veggies. At the end of the week, what is your number? Aiming for 20-30 per week is a great place to be. If you’re nowhere close to that, no worries! Try again next week.

“Dress” your Carbs

Ever wonder why taking medicine on an empty stomach might not be a great thing? Or perhaps drinking alcohol? When the stomach is empty, there is no buffer, and whatever you ingest has a quicker, stronger effect on your cells. Same thing with carbs: if you eat something that is high in carbs, particularly refined carbs (e.g. white bread, pasta, rice) or sugar (desserts) on an empty stomach, this will lead to a very high glucose spike.

Consider a green starter to each meal, which means having a vegetable before the carb. Or “dress” your carbs with fats, proteins, and fiber. The glucose spike from eating two pieces of white bread would be far higher than a sandwich with two pieces of white bread with avocado, greens, tomatoes, and a protein source in between. Better yet, choose whole wheat bread, as the fiber will also slow down the glucose spike.

Move After Eating

In the post-meal state, when the glucose is first starting to spike, your body is trying to figure out what to do with it. Is it going to go to the liver for long term storage? Is it going to go into the fat cells? How about the muscles? If you move a bit after eating, your muscles will start to soak up the sugar to use as energy, rather than going into fat cells. 

This doesn’t have to be intense exercise. Simply walking for five or ten minutes after a meal will help to decrease the glucose spike by sending the glucose into the muscles instead of the fat, which can be very helpful for weight management over time.

Apple Cider Vinegar (ACV) is your Friend

Vinegar can help decrease glucose spikes. This is particularly helpful if the vinegar is taken about 20 minutes before consuming something that could potentially spike glucose. It is important to only have a small amount, 1 - 2 tablespoons, and to dilute it.

As the taste of vinegar can be vile, I like to make an ACV tonic, which I drink a couple times per week. Here is the recipe:

  • 1 - 2 tablespoons organic raw ACV (maybe start with 1)

  • Liquid stevia to taste, or other natural zero-calorie sweetener (no sugar, as this will negate the effects!)

  • 1/4 tsp cinnamon (or keep cinnamon sticks in the bottle of ACV)

  • Big squeeze of lemon

  • 8 oz water

  • Mix it up, apple sliced and/or lemon wedge optional for garnish

Enjoy!

Written by Jacob Tyson, DPT - Physical Therapist, Yoga Instructor and The Wellness Station Team